Yun-Seong VS Siegfried
- Keep your stances simple with Yun-Seong. He has quite the arsenal of tech crouches and jumps to annoy you with, and can make utilizing Siegfried's stances more trouble than it's worth.
- To explain the above point:
iWS (B) on block is interesting in this match-up -
SCH K will trade with
K, but will beat
AA. However,
SCH A will beat
K, but clash with the first hit of
AA and lose to the second, as well as lose entirely to
44B.
SCH B will beat
44B, but lose to both
K and
AA. Entering
Chief Hold from
iWS (B) creates an interesting rock-paper-scissors type of mixup for both of you - I recommended caution when using
iWS (B).
- Yun-Seong can close distance with
66A,
44A,
11A, and
9B+K. The first three of those are able to be auto-Guard Impacted with
SBH, and
9B+K is steppable and runnable to your left.
- Yun-Seong can Soul Crush you very fast if you take to blocking the entire match. At maximum range,
66A+B is unpunishable and will crush in
8 - as is
66B.
11B,
33B,
66A,
6A+B,
3B - all are similar in that they are either unpunishable or barely punishable for Siegfried, crush in under
10, and are extremely linear (save
66A). Make sure to step or Guard Impact the linear moves - don't just sit there and take it.
-
6B is a safe, linear poke that he can enter stance from. He's at
-10 on block if he doesn't enter stance from it, though
3K or
4K will stuff any further offense if he does go into Crane, and
3K will leave him back turned if he attempts
6BB, allowing you to possibly go for
3KKB. It loses some of its usefulness if he knows you can punish him for doing anything other than just
6B - make sure to punish him when you can.
- While
236KK does technically give you a guaranteed back grab, the timing of it is extremely precise and can be affected by spacing, making the "guaranteed" part of that back grab a bit iffy. However, if you know they're going to duck after you block it,
1B will do around the same amount of damage as a back throw
(63 - 75 damage). Note that it can be extremely hard to even get the grab to come off correctly, and with random camera shifts, it's possible that you'll end up whiffing an accidental
3B.
- If you're expecting a
44B,
B6 or
2A will stuff it at medium range, or if they're farther off,
6B. If they're at close range when they attempt it, wait for them to come back in, step to your left, and
1B for maximum punishment.
- To touch on
Crane's auto-evade - the only match where you'll have every vertical auto-evaded, is the match where you become complacent with your verticals
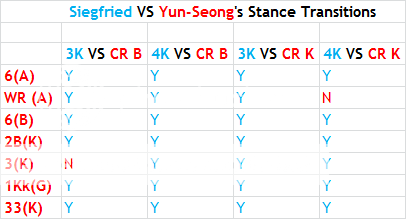
- If you've ever had your stance killed by somebody just because they blocked a move that transitions, you know how annoying and frustrating that can be. However, we get to inflict that annoyance on Yun-Seong in this match-up. Below is a list of the two kicks Siegfried can utilize to kill Crane entrances, both of which will never lose - only trade - to a Crane move from a blocked transition.
Y = You can interrupt
N = You cannot interrupt; will trade with Yun-Seong
It's not an overwhelmingly difficult match-up for Siegfried by any means, and it has small problems more than anything. Siegfried's range (
6B,
B6,
agA,
SCH A+B,
2A) and ability to control space give him the advantage in this match-up - don't squander that advantage by being overconfident.
mikosu's addendum: In general, spacing out Yun-Seong should be his focus. His rush-in tools are usually unsafe, like
44A. My advice against Siegfried would be for Yun-Seong to stay close most of the time. Siegfried's job is to make that hard.